CASE Action in NICE CXone Studio – Complete Guide
 VoIP Trainers4 min read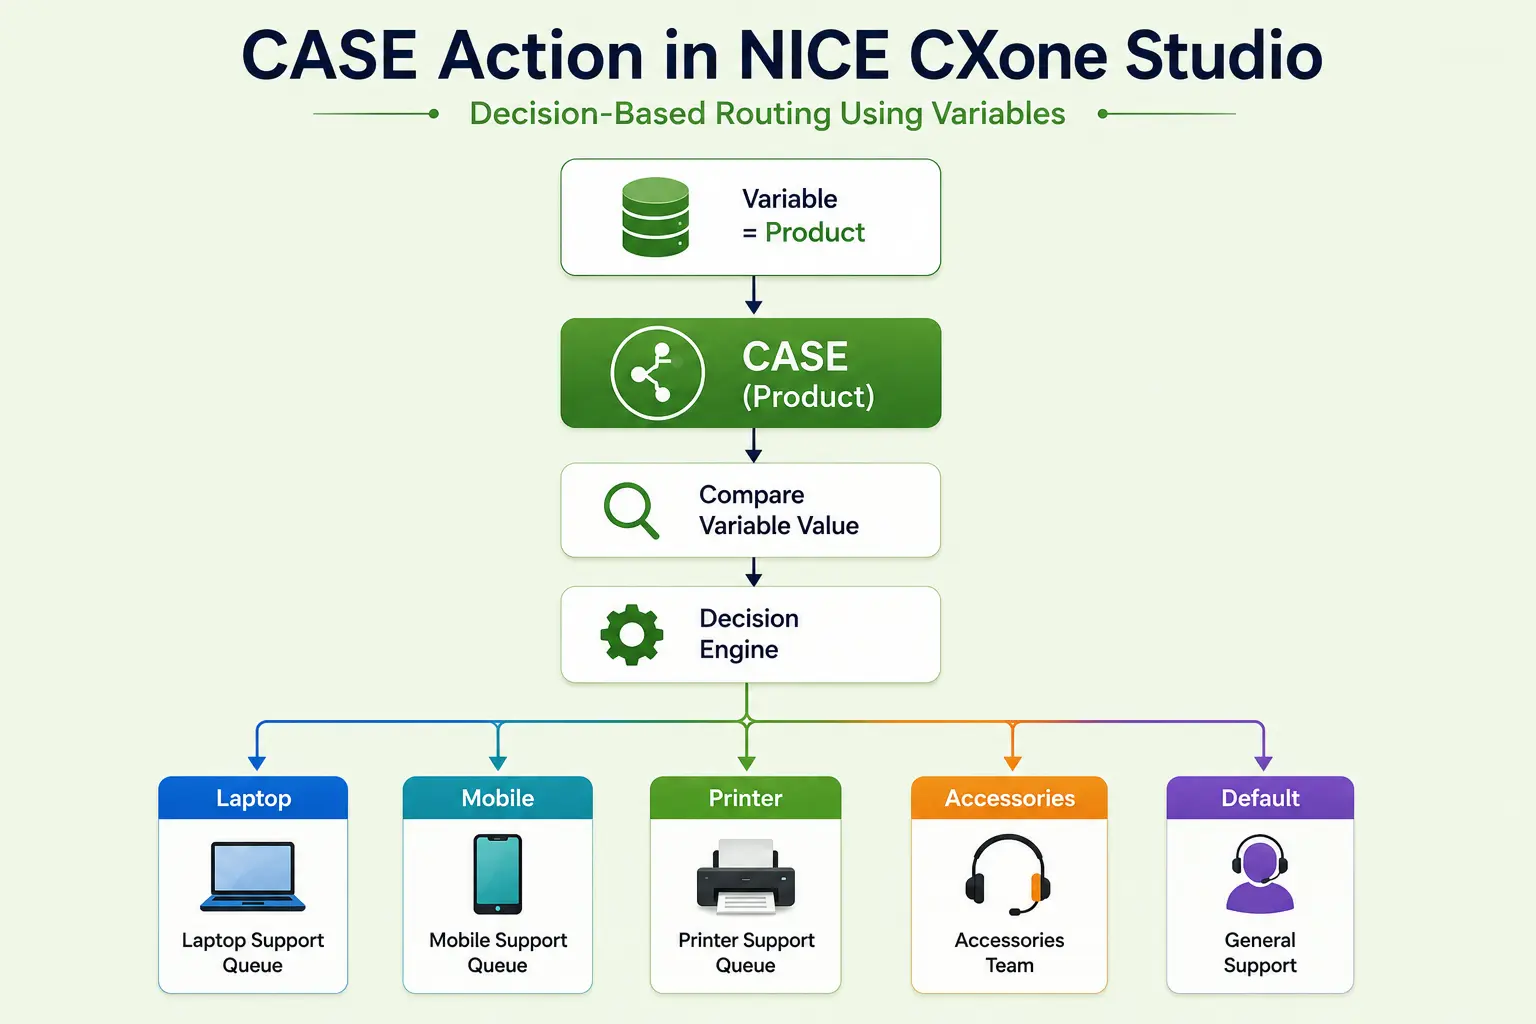
The CASE action in NICE CXone Studio (Desktop Studio and Studio) is a decision-making action that allows your script to follow different execution paths based on the value stored in a variable. It functions similarly to a CASE statement or switch-case statement in programming languages such as C#, Java, JavaScript, or SQL. Instead of creating multiple nested IF conditions, the CASE action provides a cleaner, more organized way to handle multiple possible values for a single variable.
What is the CASE Action?
The CASE action evaluates the value of a specified variable and compares it against multiple predefined branch conditions. If a match is found, the script follows the corresponding branch. If none of the values match, the script follows the Default branch.
Think of it like this:
Variable = Product
IF Product = “Laptop” → Go to Laptop Queue
ELSE IF Product = “Mobile” → Go to Mobile Queue
ELSE IF Product = “Printer” → Go to Printer Queue
ELSE → Go to General Support
Instead of writing all these IF statements manually, the CASE action performs the same logic with a much cleaner visual design.
Why Use the CASE Action?
The CASE action is useful whenever one variable can have multiple possible values.
Common business scenarios include:
- Product selection
- Department routing
- Language selection
- DNIS routing
- IVR menu choices
- Customer type
- Priority level
- Region-based routing
- Payment status
- CRM lookup results
Instead of stacking many IF actions, one CASE action handles everything.
Real-World Example 1 – Product Selection
Suppose a customer opens a live chat.
The pre-chat form asks:
Which product do you need help with?
○ Laptop ○ Mobile ○ Printer ○ Accessories
The selected product is stored in a variable:
Product = “Laptop”
The CASE action checks this variable.
CASE(Product)
Laptop ↓ Laptop Support Queue
Mobile ↓ Mobile Support Queue
Printer ↓ Printer Support Queue
Accessories ↓ Accessories Team
Default ↓ General Support
The customer is automatically routed to the correct department.
Real-World Example 2 – IVR Menu
Customer calls customer service.
Press 1 for Sales
Press 2 for Support
Press 3 for Billing
Press 4 for Complaints
DTMF is stored as:
MenuChoice = 3
CASE evaluates:
CASE(MenuChoice)
1 → Sales
2 → Support
3 → Billing
4 → Complaints
Default → Operator
Real-World Example 3 – Language Selection
Customer chooses language.
Press
1 English
2 Spanish
3 French
Stored as
Language = 2
CASE 1 → English Prompt
2 → Spanish Prompt
3 → French Prompt
Default → English
Real-World Example 4 – DNIS Routing
Incoming calls arrive on different phone numbers.
8881234567
8771234567
8661234567
Variable:
DNIS
CASE
8881234567 ↓ Sales Script
8771234567 ↓ Collections Script
8661234567 ↓ VIP Support
Default ↓ Customer Service
Supported Script Types
Input Properties
Caption
Purpose
Displays a custom name beneath the action on the Studio canvas.
Example
Route Department
Check Product
Language Selection
Using meaningful captions makes scripts easier to understand.
Variable
This is the variable whose value CASE will evaluate.
Example
Product
Language
DNIS
Skill
CustomerType
MenuChoice
Example
Variable = Product
If
Product = Mobile
CASE searches for a branch named: Mobile
Result Branch Conditions
The CASE action creates multiple branches.
Each branch corresponds to one possible value.
Example
Variable = Status
Branches
New
Open
Pending
Closed
Cancelled
Default
If
Status = Pending
CASE follows
Pending
branch.
Default Branch
The Default branch is extremely important.
It executes whenever:
- no branch matches
- variable is empty
- unexpected value is received
- value contains typo
- value is NULL
Example
Branches
Gold
Silver
Bronze
Customer value
Diamond
Since no branch exists,
CASE follows
Default
Always connect the Default branch to avoid script failures or dead ends.
Dependencies
Before using CASE:
Every possible variable value should have a corresponding branch.
Example
Product
Laptop
Mobile
Printer
Tablet
Create all four branches.
Also connect Default.
Without Default, unexpected values may leave the script without a valid execution path.
How CASE Works Internally
Read Variable
↓
Compare Value
↓
Does Branch Exist?
↓
YES
↓
Execute Matching Branch
↓
NO
↓
Execute Default
How to Add a Branch
Step 1
Place the CASE action onto the Studio canvas.
Step 2
Set
Variable = Product
Step 3
Drag a connector from CASE to another action.
Step 4
The Pick Branch window opens.
Step 5
Click
to create a new branch.
Step 6
Enter the value.
Example
Laptop
Click OK.
Step 7
Repeat
Mobile
Printer
Accessories
Default
until all branches are created.
Example Script
Customer selects a department. Menu
↓
Capture Input
↓
MenuChoice Variable
↓
CASE(MenuChoice)
1 ↓
Sales Queue
2 ↓
Technical Support
3 ↓
Billing
4 ↓
Complaints
Default ↓
Operator
Another Example – Customer Membership
Customer type retrieved from CRM.
CustomerType
↓
CASE(CustomerType)
Gold
↓
VIP Queue
Silver
↓
Priority Queue
Bronze
↓
Normal Queue
Default
↓
General Queue
Advantages of CASE
- Cleaner than multiple IF actions.
- Easier to read and maintain.
- Supports unlimited branches.
- Faster script design.
- Ideal for routing and menu-driven workflows.
- Makes troubleshooting simpler.
- Scales well as business logic grows.
CASE vs IF Action
| Multiple values | ✅ Yes | ❌ No |
| Two-way decision | ❌ | ✅ Yes |
| Readability | Excellent | Moderate |
| Best for menus | ✅ | ❌ |
| Large routing logic | ✅ | ❌ |
| Complex comparisons | Limited | Better for expressions |
Summary
The CASE action is one of the most valuable routing components in NICE CXone Studio. It simplifies complex decision-making by evaluating a single variable against multiple predefined values and routing execution accordingly. Whether you’re building IVRs, chatbots, email workflows, or digital interaction scripts, CASE helps create scalable, readable, and maintainable call flows while ensuring unexpected values are safely handled through the Default branch - NICE CX Training | VoipTrainers.