Agent Workflow Configuration in NICE CXone (Detailed Guide)
 VoIP Trainers3 min read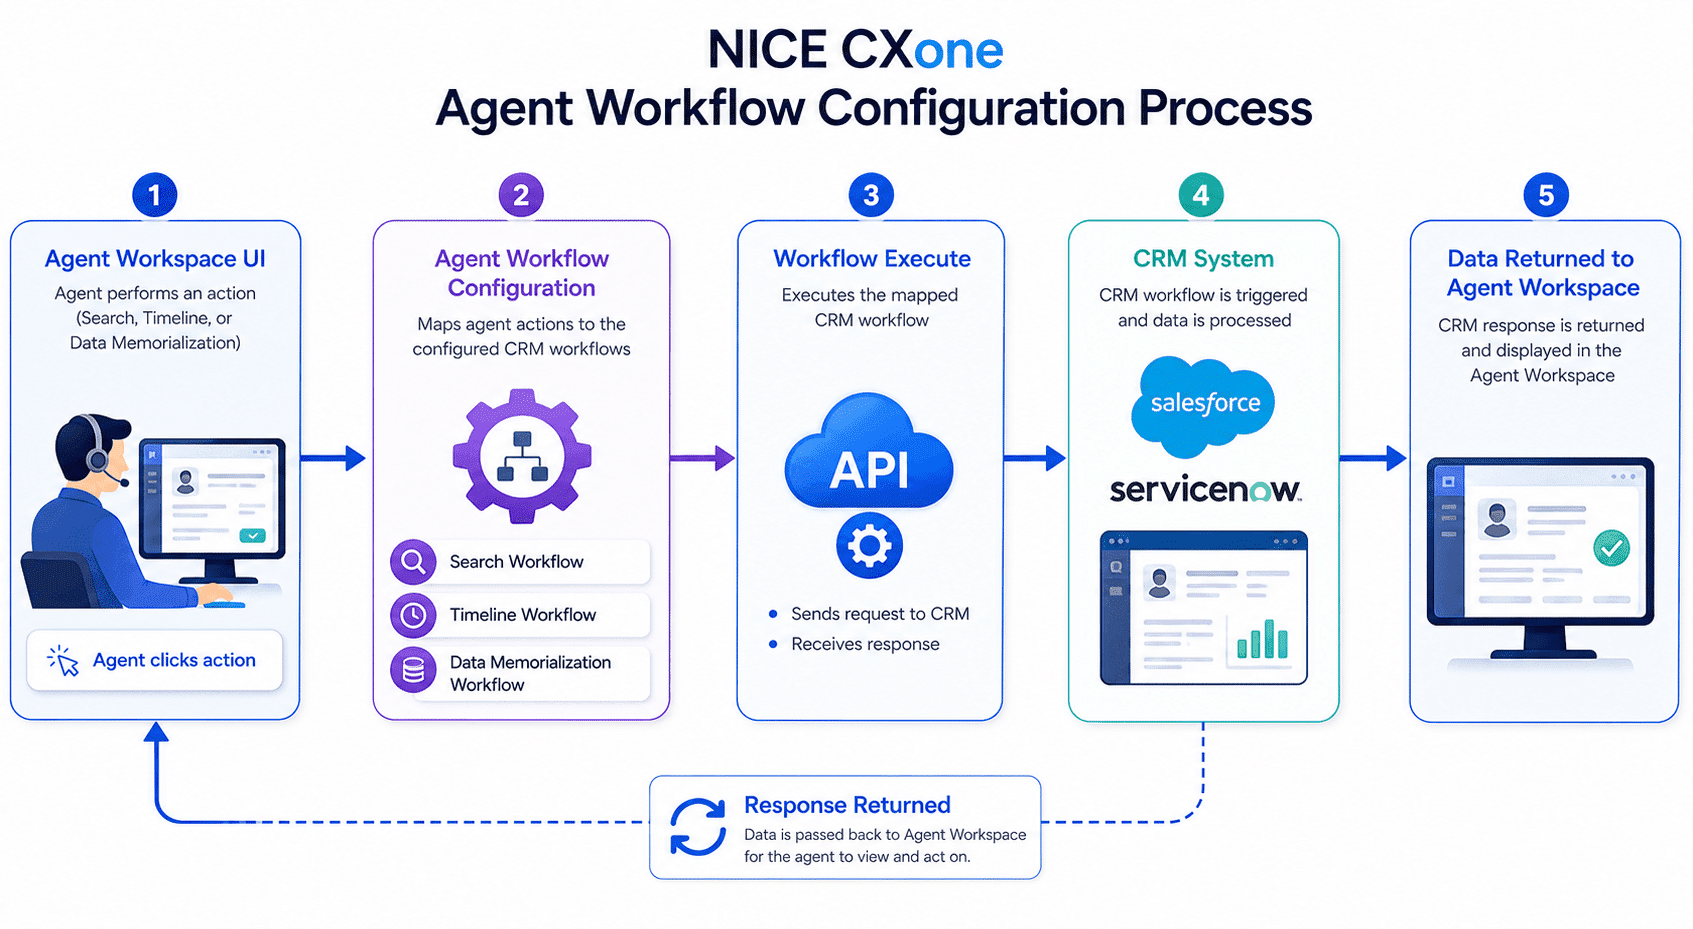
Agent Workflow Configuration in NICE CXone
Agent Workflow Configuration is a key action in NICE CXone Desktop Studio used to connect your CRM workflows with the Agent Workspace.
In simple terms:
It tells the system “When an agent performs an action → trigger this CRM workflow.”
This is essential when integrating platforms like Salesforce, ServiceNow, or any CRM with NICE CXone.
Why This Action is Important
Without this configuration:
Agents cannot trigger CRM workflows Customer data won’t sync properly Automation inside Agent Workspace won’t work
With it:
Agents get real-time CRM data Automation reduces manual work Customer experience improves
What Agents Can Do Using This
This action enables 3 major agent activities:
1️. Search (Second-Level Search)
- Agent clicks Refresh/Search
- Gets more detailed customer data
2️. Add Timeline Activity
- Agent logs interaction into CRM
- Example: “Customer called regarding billing issue”
3️. Data Memorialization (ACD Data Mapping)
- Stores call/chat data into CRM fields
- Example:
- Call duration
- Agent ID
- Queue name
High-Level Workflow Diagram
Here’s how everything connects:
Agent Action (Workspace)
↓Agent Workflow Configuration
↓Workflow Execute Action
↓CRM Workflow Triggered
↓CRM (Salesforce / ServiceNow)
↓Data Displayed Back in Agent Workspace
Where to Find It in Studio
Location:
Framework Tab → Agent Workflow Configuration
Dependencies
Before using this action, ensure:
Agent Application
Agents must use one of:
- Agent Workspace (Desktop)
- Agent Workspace (Browser Extension)
- Agent for Microsoft Teams
CRM Integration Setup
- Must be configured in Agent Integrations page
- At least one workflow must exist
Login Requirement
To use the wizard: Login using CXone username & password
Session ID login → Wizard won’t open
Required Pairing
You MUST use:
Agent Workflow Configuration
+Agent Workflow Execute
These two always work together.
Script Type Support
Phone Scripts Digital Scripts (Chat, Email, etc.)
Input Properties
Caption
- Label for your action
- Example: CRM Workflow Setup
AgentUserID
Important difference:
| Script Type
|
Format
| | — | — | |
Phone
|
{__AgentID}
| |
Digital
|
{AgentID}
|
Wrong format = data won’t show in UI
SearchWorkflow
- Workflow used when agent performs search
TimelineWorkflow
- Workflow used when agent logs activity
DataMemorializationWorkflow
- Workflow used to store ACD data in CRM
SearchCacheKey
Used to pass search results from:
Workflow Execute → Agent Workspace
Leave empty if using Custom Event instead of cache
SearchInput
- Dynamic search field (configured in wizard)
Example: phone number, email, customer ID
Workflow Configuration Diagram
+——————————+
| Agent Workflow Configuration |
+——————————+
    |       |       |

    ↓       ↓       ↓
Search Timeline DataSave
Flow Flow Flow
    ↓       ↓       ↓

 CRM Workflows (Mapped)
Result Branch Conditions (Error Handling)
These help your script handle different situations:
| Condition
|
Meaning
| | — | — | |
Default
|
Normal path
| |
Success
|
Everything worked
| |
InvalidAgentId
|
Agent ID incorrect
| |
AgentNotConnected
|
Agent offline
| |
InvalidWorkflowConfigData
|
Wrong config
|
Branching Diagram
      Action Executes

             ↓

  -------------------

    |                |          |

 Success  Error   Invalid

    |                |          |

 Continue  Retry   Alert
Configuration Wizard (Step-by-Step)
Step 1: Open Wizard
Double-click the action
Step 2: Select CRM Configuration
- Choose integration (e.g., Salesforce)
Step 3: Select Agent Actions
✔ Search ✔ Timeline ✔ Data Memorialization
Step 4: Map Workflows
Example:
| Action
|
Workflow
| | — | — | |
Search
|
Customer Lookup
| |
Timeline
|
Case Notes Update
| |
Data
|
Save Call Details
|
Step 5: Save Configuration
Click Save Properties auto-fill
Full Integration Flow Diagram
[Customer Interaction]
↓[Agent Workspace UI]
↓(Agent clicks action)
↓[Agent Workflow Configuration]
↓[Workflow Execute]
↓[CRM API Call]
↓[CRM System]
↓[Response Returned]
↓[Displayed in Agent Workspace]
Example Use Case
Scenario: Customer Calls Support
- Agent receives call
- Clicks Search
- Customer data loads from CRM
- Agent handles issue
- Adds note (Timeline)
- Call details saved automatically
Best Practices
Always match same CRM config in both actions Use correct AgentID format Test workflows before production Keep cache key clean unless needed Handle error branches properly
Common Mistakes
Using {__AgentID} in digital script Not linking Workflow Execute No CRM workflow configured Wrong mapping in wizard
Final Summary
Agent Workflow Configuration = Bridge between Agent + CRM
It allows:
- Smart data retrieval
- Activity logging
- Automated data storage
When combined with Workflow Execute, it creates a fully automated CRM integration inside NICE CXone Training.